
The testing stage in any project, including Salesforce projects, is crucial to ensure high quality and efficiency in implementing solutions. It requires an understanding of the specifics of a given system, the ability to create complex test cases, and knowledge of tools that support the tester’s work. Tailoring test scenarios to key areas of Salesforce and continuously adapting testing strategies to the evolving Salesforce platform is also important.
I have been involved in testing in Salesforce projects for almost five years. I hold several certificates, but I am still expanding my knowledge. Today, I’m happy to share my knowledge of several useful and even necessary tools in a tester’s work, and that makes our job easier. In my next article, I will convey insights on best practices to implement in your work for effective testing in Salesforce projects.
Equipping yourself with the right tools can significantly increase the effectiveness and efficiency of testing in Salesforce projects. Below, I will introduce the TOP 5 commonly used tools that can improve the work of any manual tester.
On a daily basis, I use the Salesforce Logins by Synebo plug-in, which is the best solution for streamlining the login process. It is clear and compact, stores login access credentials on different environments, and makes it easy to manage multiple Salesforce accounts. This plug-in enables me to easily switch between different test and production environments, which is priceless when testing different scenarios and functions.
When we click on the blue plus (+) icon – as shown in the screenshot below – a window opens with the required data to fill in.
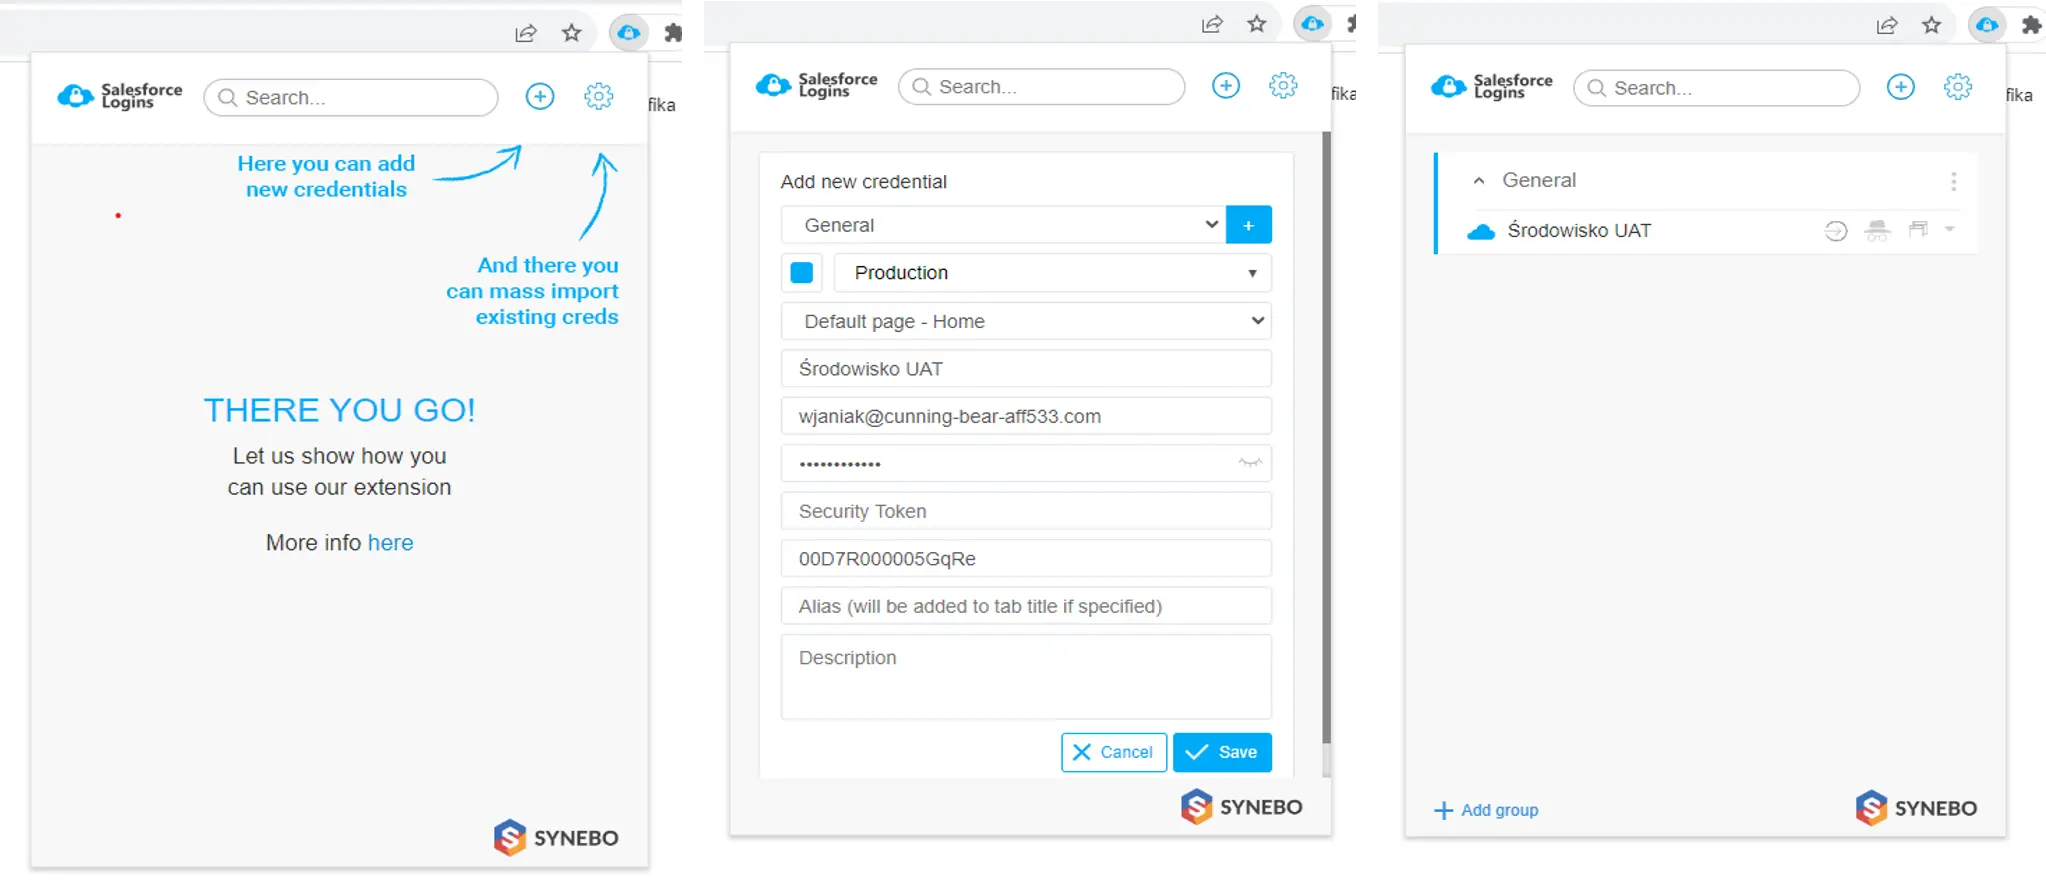
Firstly, we select the folder where the link to the environment should be located. Then, we choose the type of environment, for example, Production, Sandbox, or Custom Domain. We provide the name, address, URL, or organization ID. Basically, we have everything ready. Now, after clicking the first icon to the right of the name we gave it (refer to the last view), the environment launches, and we are already automatically logged into it.
The plug-in significantly speeds up the work; we no longer have to enter the data manually. This is very helpful, especially when we are working on multiple environments. This way, we avoid the repetitive login process and save time. The tool ensures data security through encrypted storage of passwords.
The performance and convenience offered by this tool are pretty impressive.
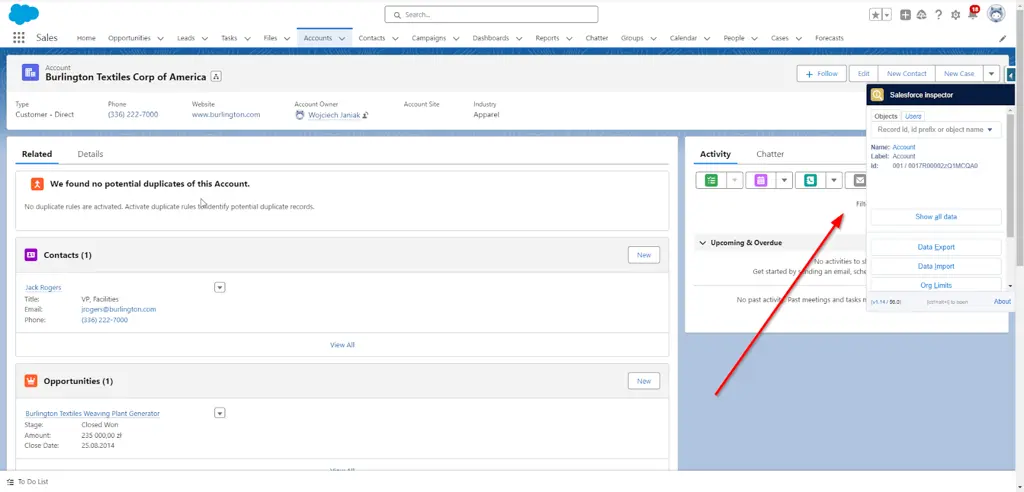
This plug-in is a productivity-enhancing tool not only for Salesforce administrators and developers but also for testers. It enables checking data and metadata directly from the Salesforce user interface.
How to use the plug-in? After installing the plug-in (for example, from here), it appears discreetly in the form of arrows on the right side of the screen (see the screenshot).

The plug-in works based on the record we are currently on.
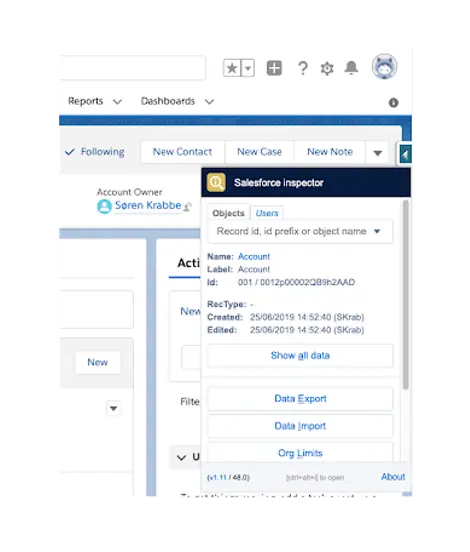
When we click the mentioned arrow, a window opens with the Object tab selected by default.
On this view, we immediately get information such as API name, Label (the label of the object in question), and Salesforce ID. Several other options are available here: Show all data, Data Export, Data Import, and Org Limits.
Personally, I use Show all data most often.
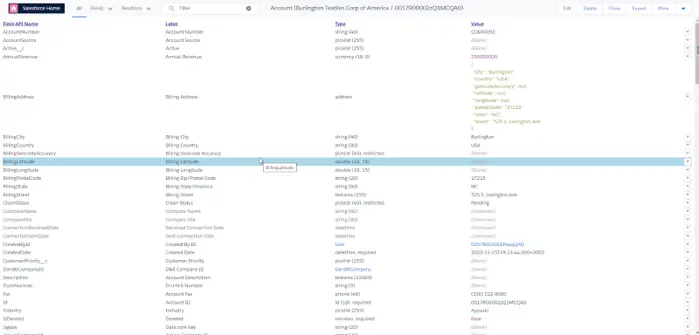
After clicking Show all Data, a new page opens. On this page, we can take a look at the following details: API Name, Label, field types, and field values currently stored.
At the top of the opened window (see the screenshot below), we have a search engine 🔍 that looks for fields based on the mentioned characteristics. In addition, we can change the values in a specific field. If the edit function is active, we double-click on the field or click Edit, and all possible editable data opens up. After entering the new value, we save it. Additionally, we can remove a record from this position using the Delete option.
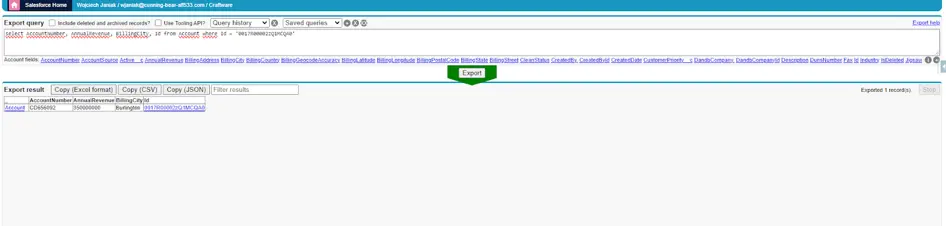
Moreover, we can clone records or export them. After clicking the Export button, a window displays the query we are building to interact with the database.
We are on the record, and its ID is selected by default. We can add any fields to the query that occur on the given object. If we are sure that the query is complete, we click the Export button. The view of records to be exported is displayed. Here, we have a choice of three different buttons: Copy (Excel format), Copy (CSV), and Copy (JSON). Depending on the format of interest, we click the appropriate button. The data is saved in the system clipboard. We can copy the file to Notepad, change the extension to a CSV file, and then use the file to import data.
As we can see, the Salesforce Inspector plug-in is a useful tool that enables quick access to data. It facilitates the verification and modification of data, enables debugging and troubleshooting, and provides deeper insights into the Salesforce instance.
As manual testers, we need a versatile tool that can handle various tasks related to data and their modifications. And this is where Workbench comes to the rescue. (Workbench has its own repository on GitHub, so we can download and put it on a local host.)
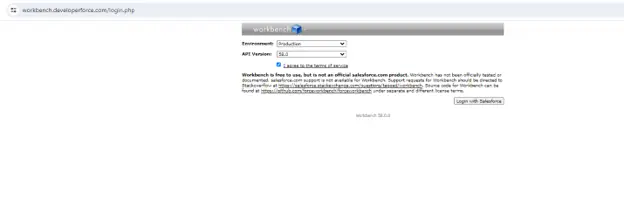
Once on the site, we need to select Environment: Production or Sandbox test environment; we also select the API Version that is suitable for us. Check I agree to the terms of service and click Login with Salesforce.
We are redirected to log in to the Salesforce environment, requiring the entry of Username and Password. We click Log in to Sandbox.

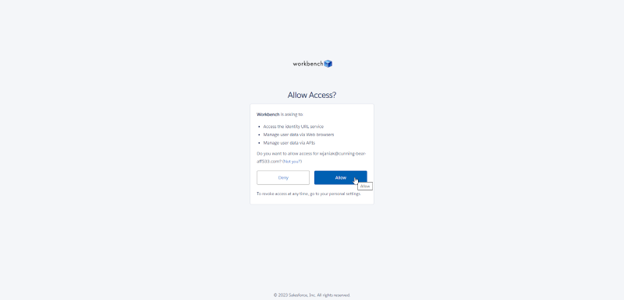
We also need to confirm access to the data. We do this by clicking the Allow button (see the screenshot below). Doing it once for a specific environment is sufficient. There is no need to confirm this during subsequent logins unless we clear the cookies.
We are logged in.
From a tester’s perspective, the Queries, Data, and Utilities tabs are important.

When we click on the Queries tab, a menu expands, and we click SOQL Query. The SOQL query builder view opens up. SOQL is the Salesforce database query language.
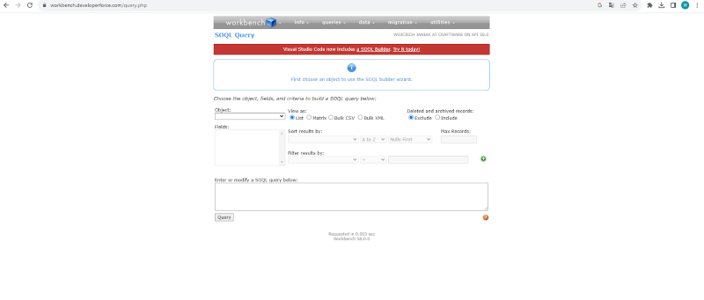
In the Object field, we select what we need (Account, Contact, or some other custom object). In the View as, we choose how fields should be presented, either as a list or as an exported CSV or XML file.
Before executing the query, we can sort the results by choosing the sorting method in the Sort result by field. If we want to filter the data in Filter results by, we indicate a field, then select an operator, such as an equals sign, and specify the value to narrow down the results. The entire currently constructed query is displayed in the Enter or modify a SOQL query below field located above the Query button.
Once we finish creating the query, we click on the Query button, and then the results of our query are displayed.
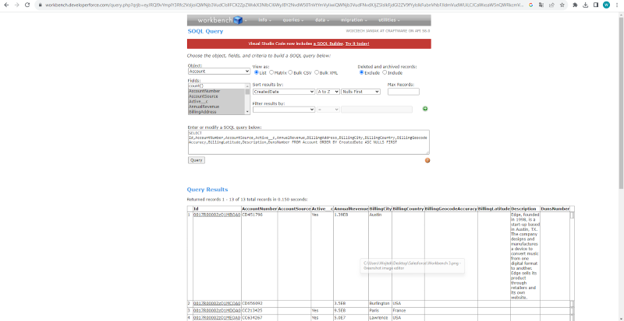
The Enter or modify a SOQL query below field can be freely edited, for example, by typing the field name we are interested in. When we add such a field, we can click on the Query button again, and then we see an additional field in the results table.
Workbench enables the automation of inserting large data sets, saving a lot of time.
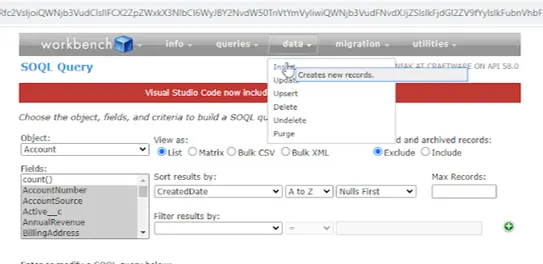
When inserting data, we select the Data tab, then Insert. The view of the data insertion wizard appears.

Firstly, we need to select the Object Type, just like in the Query constructor: Account, Lead, Contact, Case, or custom object. Next, we choose whether we want to create a Single Record or use the From File option. The From File option is used to add multiple records from a previously prepared CSV file.
Below, I will show the Single Record track. After clicking Next, a table with fields to complete is displayed.

The mandatory fields are highlighted in red. After filling in the mandatory and desired fields, we click the Confirm Insert button. If we have completed everything correctly, we get a success message, along with the Salesforce ID.
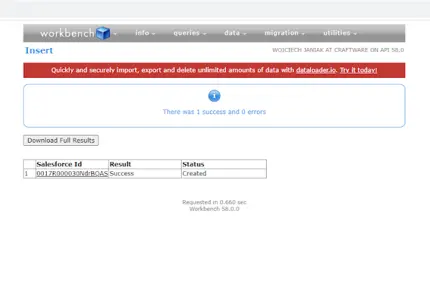
After hovering the mouse cursor over the ID, options appear, including the View in Salesforce option. Clicking on it redirects us to the view of the newly created record in Salesforce.
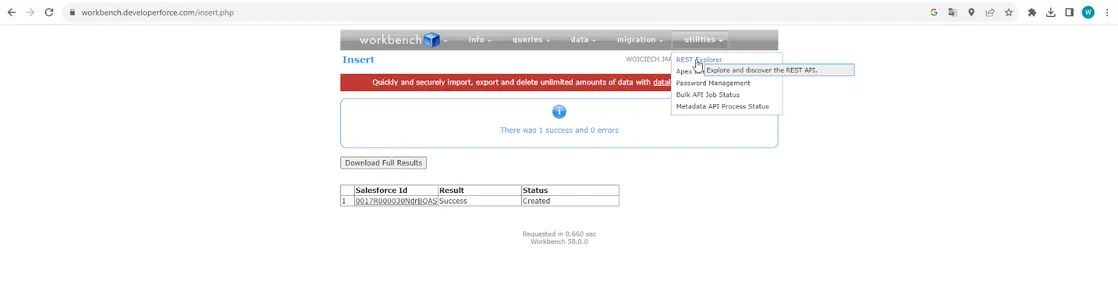
Another Workbench feature is a module for REST API testing. Click on the Utilities tab and then REST Explorer.
The view with parameters for creating requests opens.
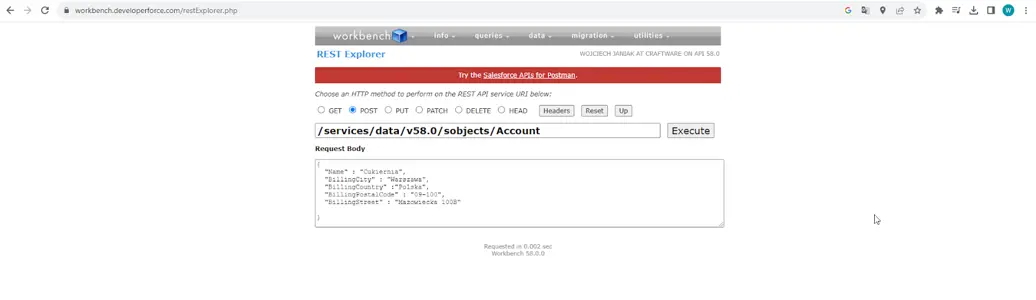
We choose the HTTP method (GET, POST, PUT, PATCH, DELETE, or HEAD). Next, we paste the URL to the endpoint we want to send the request. In the field below, we paste or manually build the request in the JSON format that we want to send. Once everything is ready, we click Execute. If everything is correct, we get a success message, along with the ID of the created record.
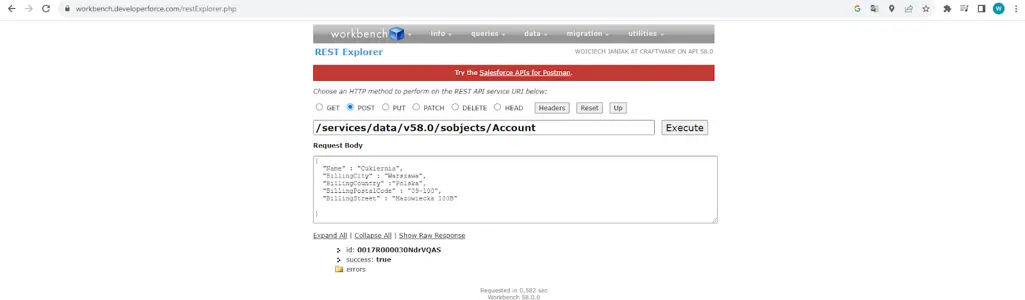
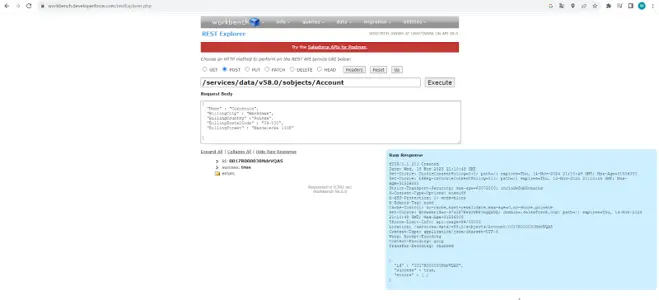
We should pay attention to the Show Raw Response link. When we click on this link, the entire Response opens up, including the return code and the rest of the details.
Workbench enables the direct inserting and deleting of data records in Salesforce instances. No more tedious manual data entry or complicated database manipulations – all of this can be done with a few clicks, saving valuable time.
The Workbench enables REST and SOAP API calls, enabling accurate integration and regression testing. You can verify data flow, test system integrations, and ensure system functionality thanks to smooth interaction with API interfaces.
But what if we want to retrieve data and perform custom logic for complex testing? With SOQL queries and Apex scripts, we can extract data and perform complex operations to check the functionality of a system or application.
-
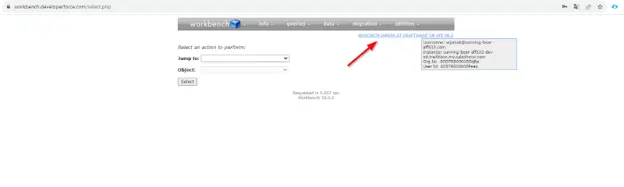
Very important tip.
It is worth checking that we are logged into the right environment. It sounds a bit trivial, doesn’t it? But let’s imagine that on a given day, we conduct tests on several environments using Workbench, so it happens that we may forget to log out. To verify, simply hover over the link shown in the screenshot below. The window displays information on the environment we are logged into, including the Username.

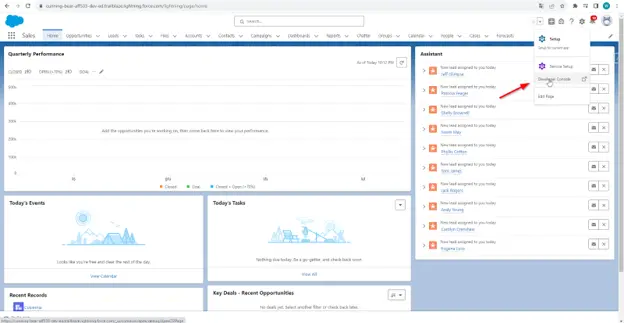
Another handy tool for testers is the Salesforce Developer Console. Yes, I know, it has “developer” in its name. We are testers, but surprisingly, this is not a forbidden tool for us. In fact, it is very beneficial. To access the tool while logged into Salesforce, we need to click the Set Up icon (cogwheel). Next, we click Developer Console.
Then, the entire developer console appears.
What can we use the developer console for?
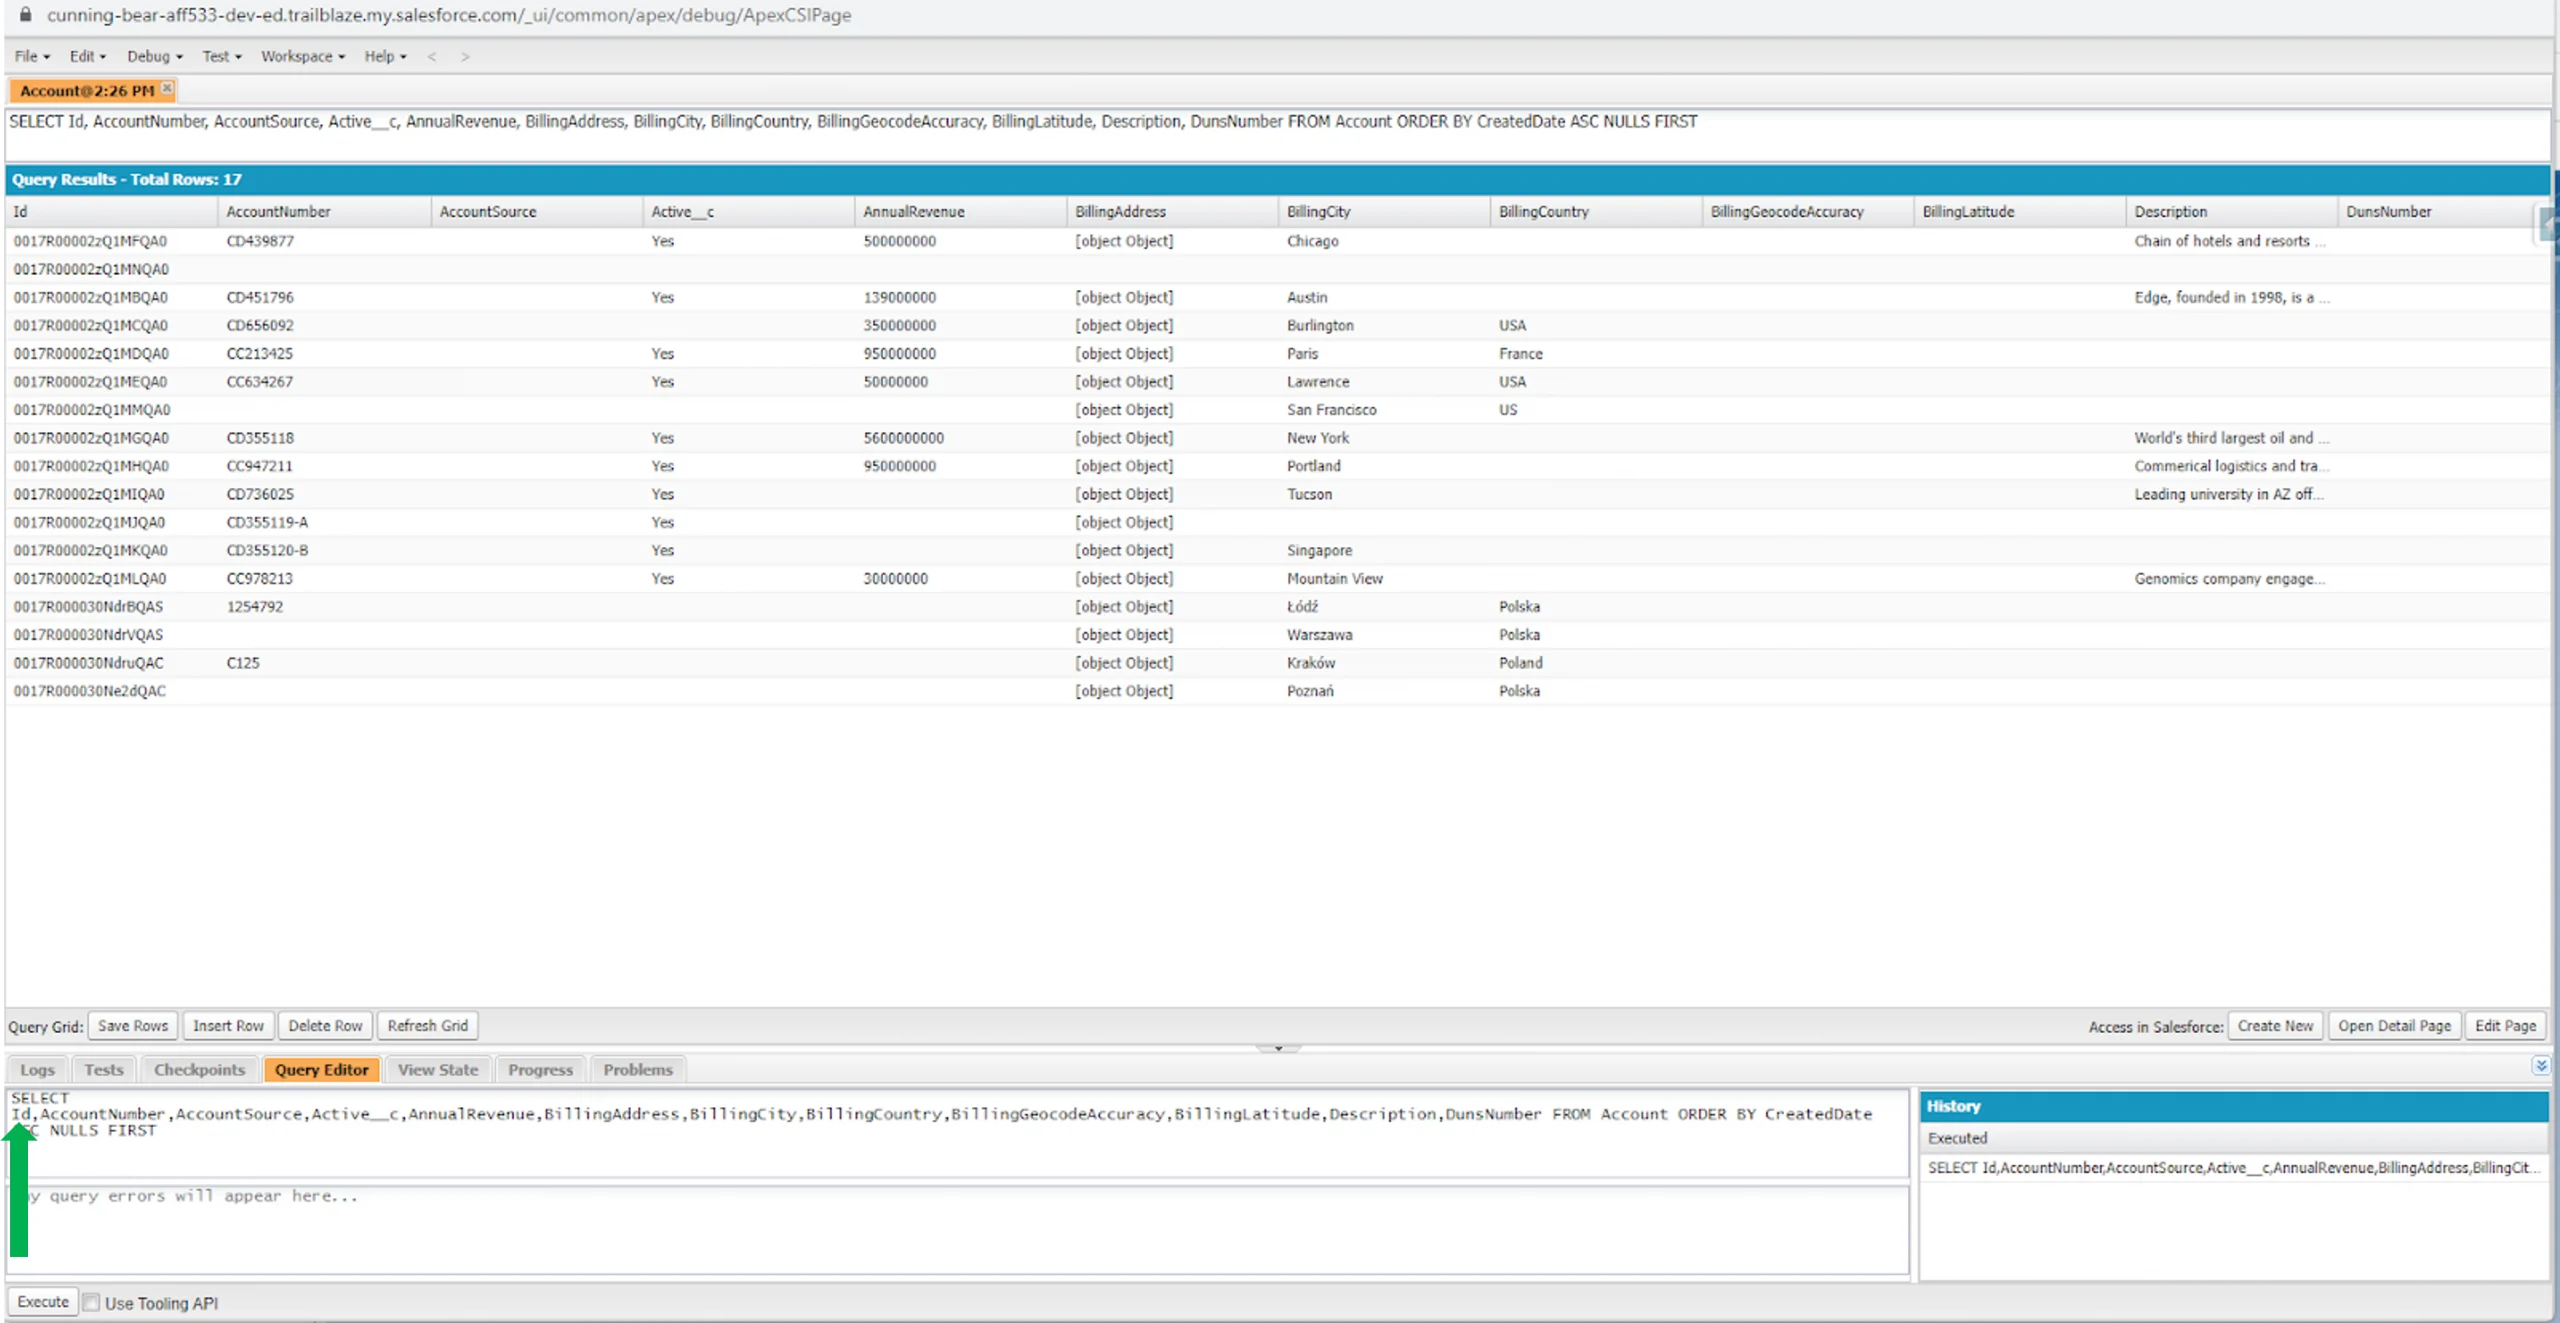
For example, we can run Query. In the Query Editor tab, we input a query into the database or paste a previously prepared one, then click on the Execute button located in the lower corner of the page. In the middle, we have an overview of all the records we are searching for, as shown in the screenshot above. We can select records either individually or collectively using CTRL and then click the Delete Row option to remove the selected records from the database.
Remember this: if we want the deletion to be effective, our query must have an ID (see the green arrow). Otherwise, deleting records is not possible.
Apart from deletion, we can directly modify the values in the fields for a given record by double-clicking on the field we want to edit. After editing, we click Save Rows, and the records update, taking on the target values we intended to enter.
What’s important is to know what type of field it is (for example, string or date) so that we can enter the correct format, ensuring that the record is updated accurately.
Another option the console provides is the ability to run batches and scripts for generating data.
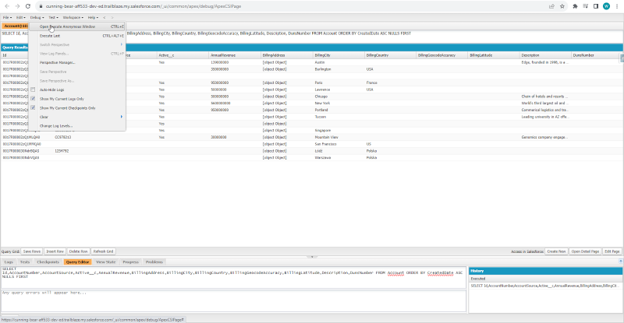
To do this, we need to click on the Debug tab. Next, Open Executive Anonymous Window.
A window named Enter Apex Code opens.
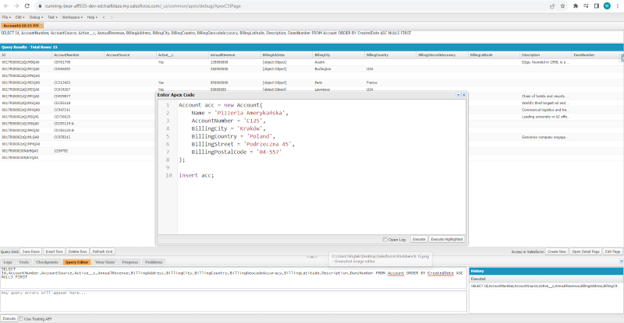
We can paste a script or batch here. For example, in the screenshot, I used a script to create an account. We click the Execute button.
The Salesforce Developer Console is a powerful tool. Its versatility makes it valuable for developers and testers, as I attempted to demonstrate in the paragraphs above. The console provides powerful tools for efficient testing and validating Salesforce applications. It supplies detailed information essential for deep analysis and quality assurance, which is crucial in creating reliable and efficient solutions on the Salesforce platform.
Postman is associated with API testing and automation, providing benefits to manual testers. It enables Salesforce integration testing with other systems and services, which is crucial in today’s complex IT environments. Postman offers a user-friendly interface and many features to streamline the API testing process.
While using Postman, we can open several tabs simultaneously, each containing different requests, allowing us to easily navigate between them.
To properly use Postman for Salesforce testing, first, we need to correctly configure the authorization between Postman and Salesforce. There are several types of such authorizations. I use the OAuth 2.0 standard protocol on a daily basis. For authorization, we need the environment address, login, user token, and the Consumer Secret and Consumer key from the specific Salesforce environment we want to connect to.
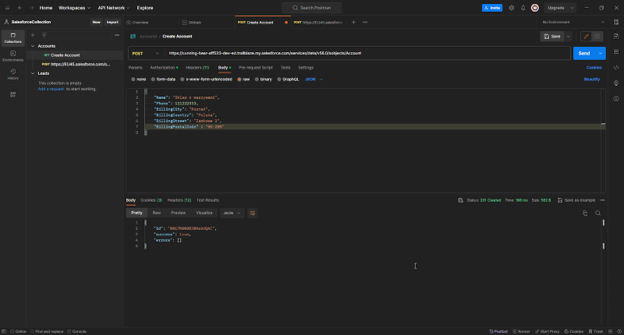
After authorization, we can start building the request. Firstly, we choose a method: post, put, delete, or other. Next, we paste the URL for the target endpoint to which we want to send the request. We click the Send button and get a response with the status code and the Response body. In this case, it is the ID and value for the Success parameter.
The strength of Postman lies in its ability to automate repetitive testing tasks. Creating scripts enables you to develop automated tests, saving time and effort while ensuring consistent and reliable test results.
Performance testing is another area where Postman is helpful. By measuring API response times and simulating high-traffic scenarios, we can identify performance bottlenecks and optimize API interfaces for maximum performance.
By utilizing the tools and methods presented in the article, we can optimize our work and achieve greater testing efficiency in Salesforce projects.
A manual tester in Salesforce needs to combine analytical skills with practical knowledge of the system. Every project is different, and flexibility and adaptation to changing requirements are crucial. The tester identifies issues and can suggest solutions that make using the system easier because they have a perspective similar to that of the system’s everyday users.
The constant expansion of knowledge and skills is essential to meet the challenges in the rapidly changing world of Salesforce. The tester is a key player in the project team. Our skills and knowledge often determine the success of system implementation and user satisfaction.
In my next article, I’ll share with you some best practices to implement in your work for effective testing in Salesforce projects.
Enjoy your tests!
- Senior Software Tester / Team Leader
-
Senior Software Tester with five years of experience in software testing. He holds several Salesforce certifications and constantly gains new knowledge in the Salesforce area. He enjoys sharing it with others and introducing juniors to the amazing world of testing in Salesforce projects. Privately, he loves playing Xbox and Nintendo Switch and is interested in soccer.